Upgrade guide
💡 Prerequisites
Before Starting the Upgrade
Please ensure the following two items are completed before starting the upgrade.
Back up important data in the cluster.
Upload the new version of the River Shield image provided by River Info to the image repository (refer to Deployment Guide > Appendix 1: How to Upload Images to Huawei Cloud SWR or Deployment Guide > Appendix 2: How to Upload Images to a Private Repository).
💡 Tip:
For files required for a private deployment, please consult River Info through the Contact Information in the left navigation bar.
Upgrading in CCE Environment
Follow the method in Deployment Guide > 1.2.1 Upload Template File Package to upload the new version of the template file package to the Huawei Cloud deployment environment.
After the upload is complete, click on the Template Instance tab in the page, and then click Upgrade to the right of the instance you want to upgrade, as shown in the image below.

In the pop-up window on the right, click on the Select Version dropdown menu and choose the new version number, as shown in the image below (leave the configuration file empty).
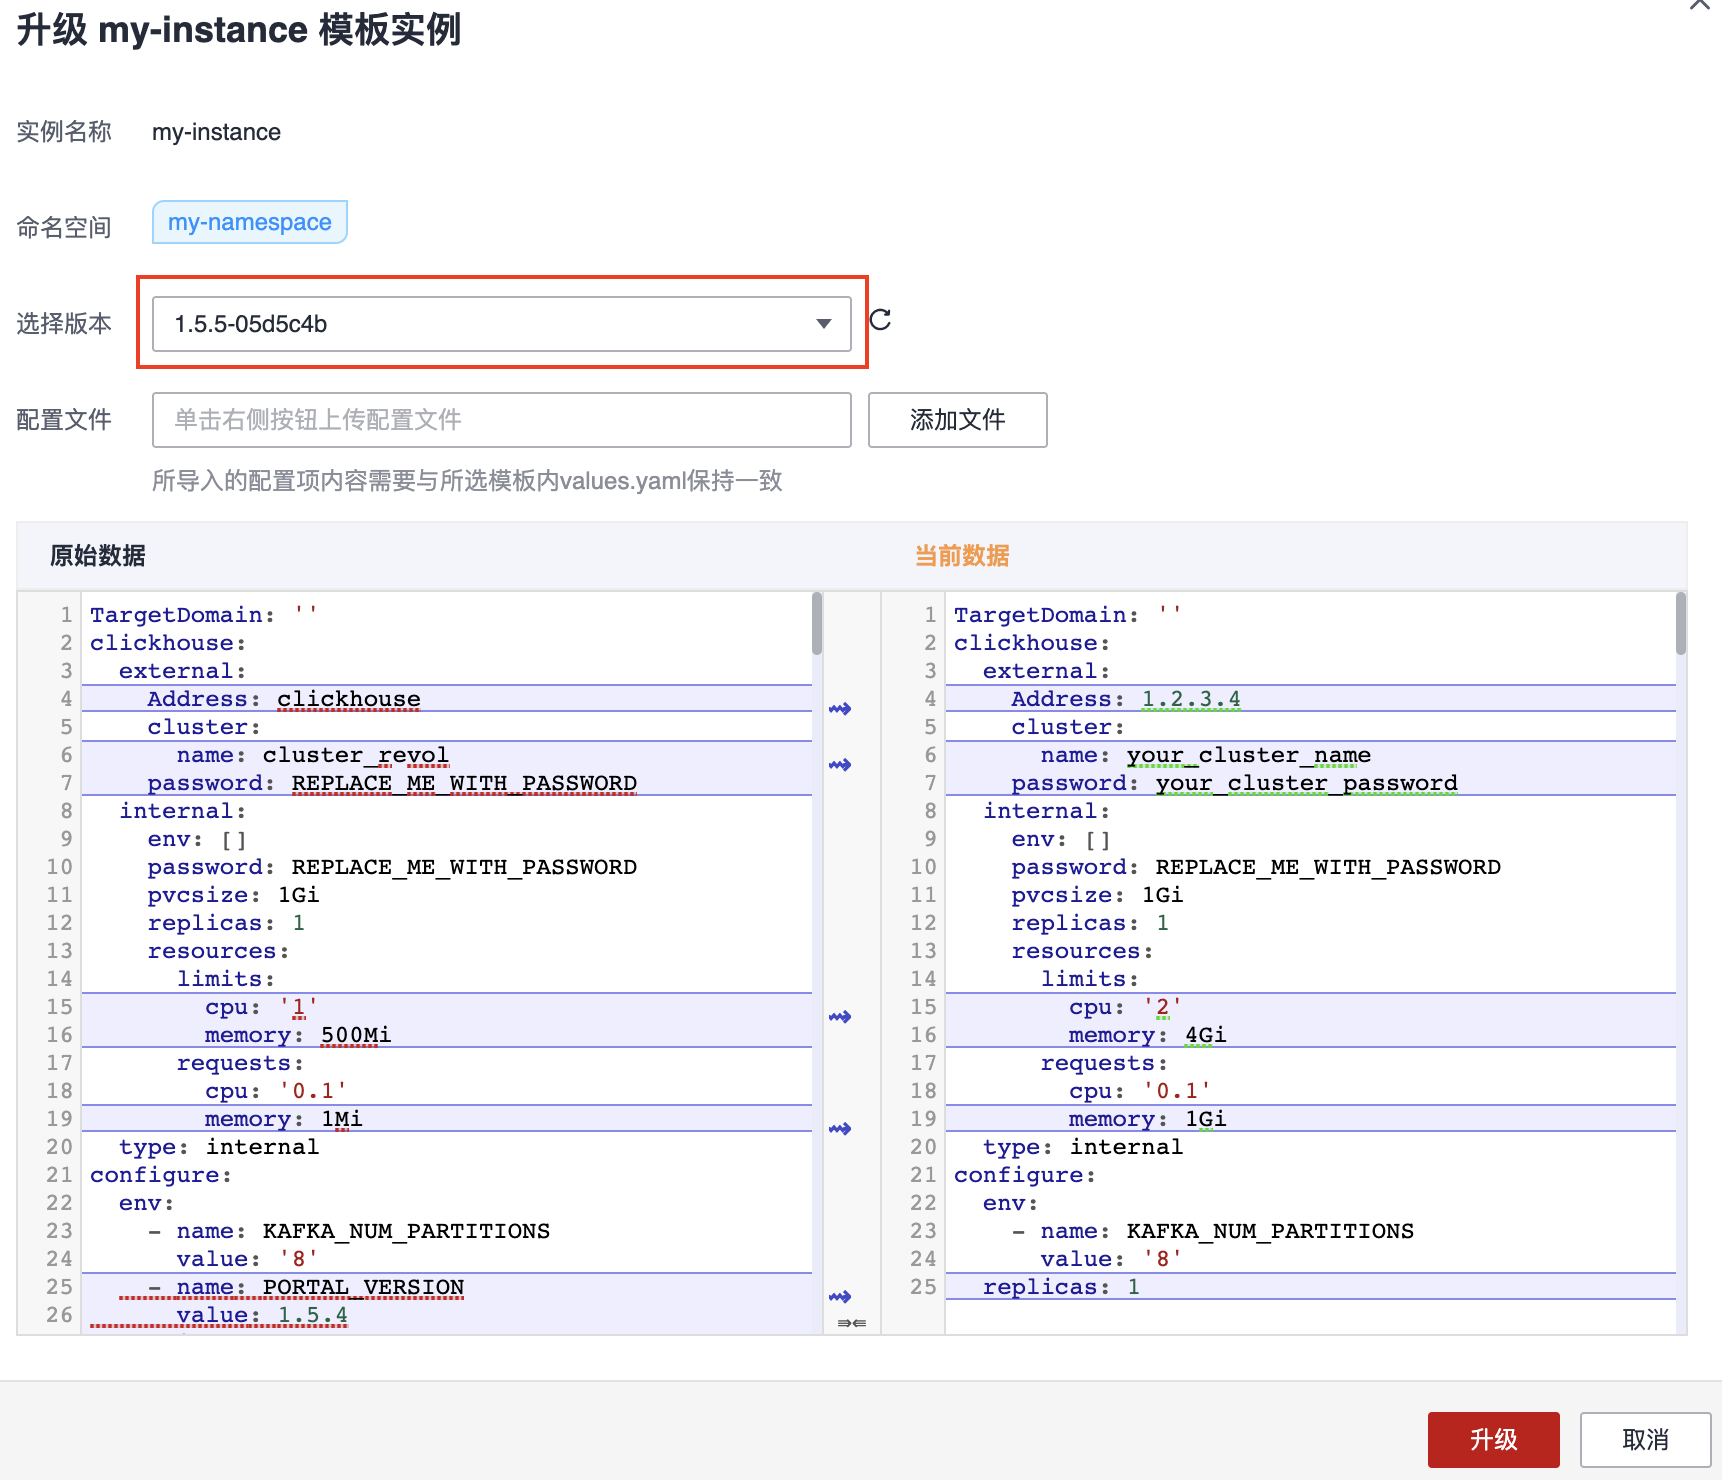
Then, you will need to compare a few configuration items in the Original Data (the old version configuration data) and Current Data (the new version configuration data) in the window, ensuring that the following configuration items in the Current Data are consistent with the Original Data. Other configuration items can remain as they are.
image > repository configuration
internal > password configuration for each service
smtp service configuration
external configuration for each service
💡 Tip:
This only applies to scenarios using their own services, and do not forget to change the type to external in the new file's own service configuration items. Ignore this configuration if you don’t have your own services. For the concept of own services, refer to section Step 2 in Deployment Guide > 2.2.1 Configure Service Parameters and Execute Deployment.
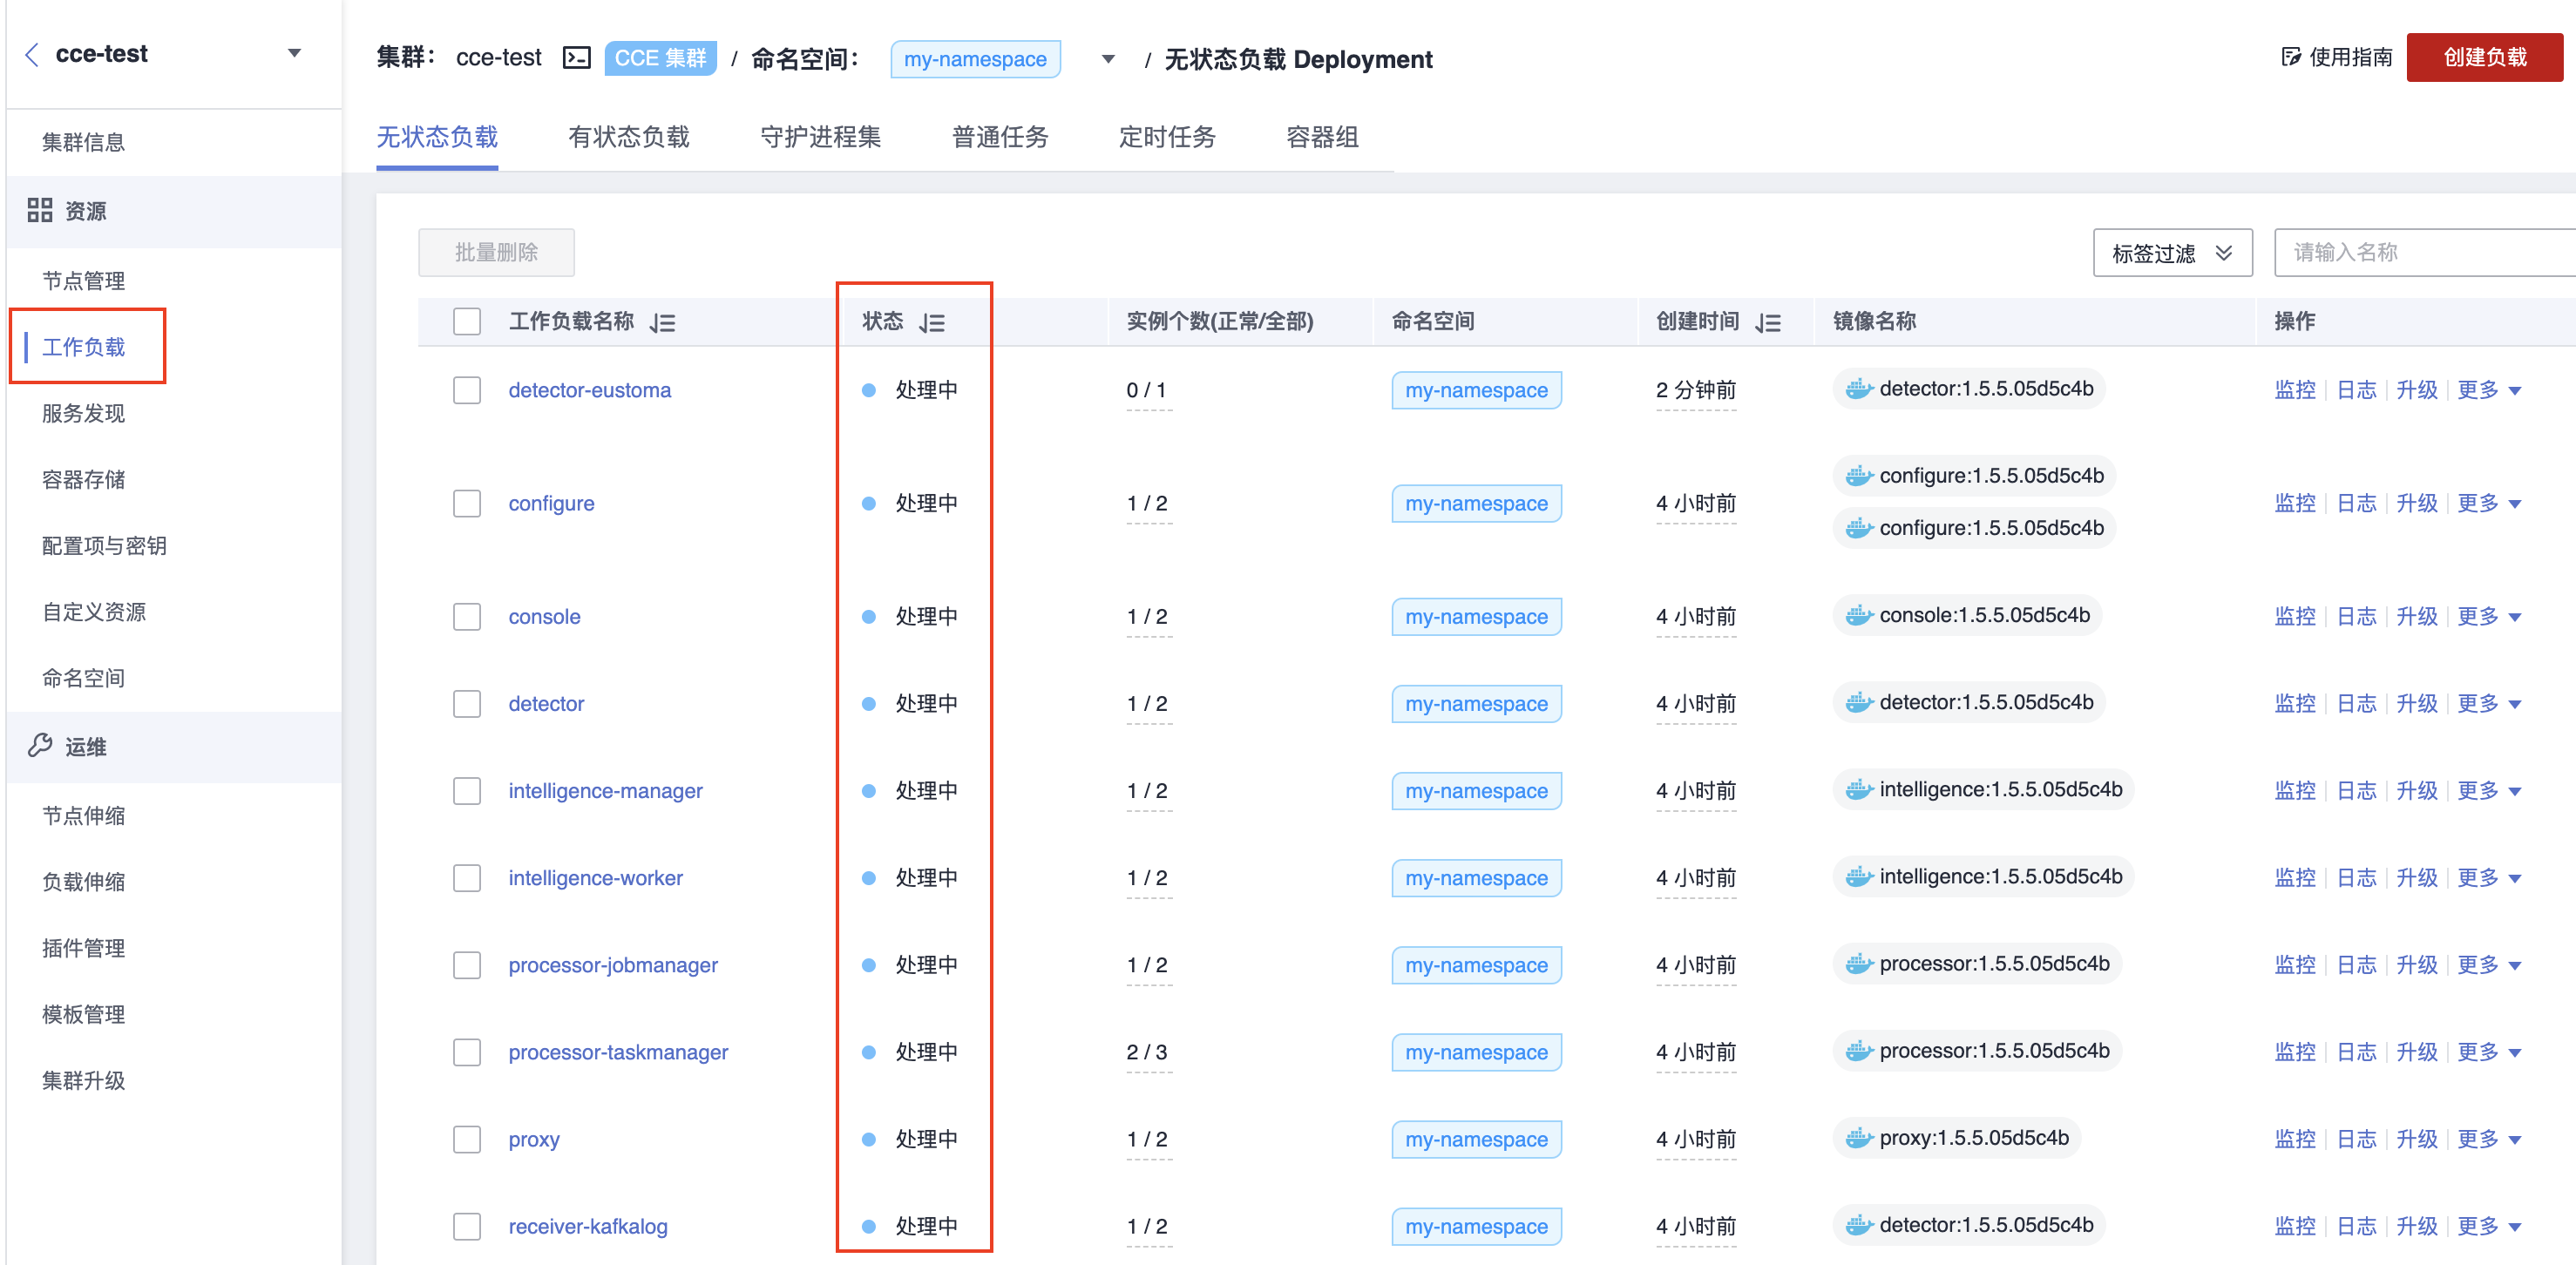
After modifying, click Upgrade at the bottom right of the window. The upgrade process will take about 5 minutes or longer (depending on network speed), please be patient. During this time, you can click on Workloads in the left navigation bar to view the upgrade status of each workload, as shown in the image below.
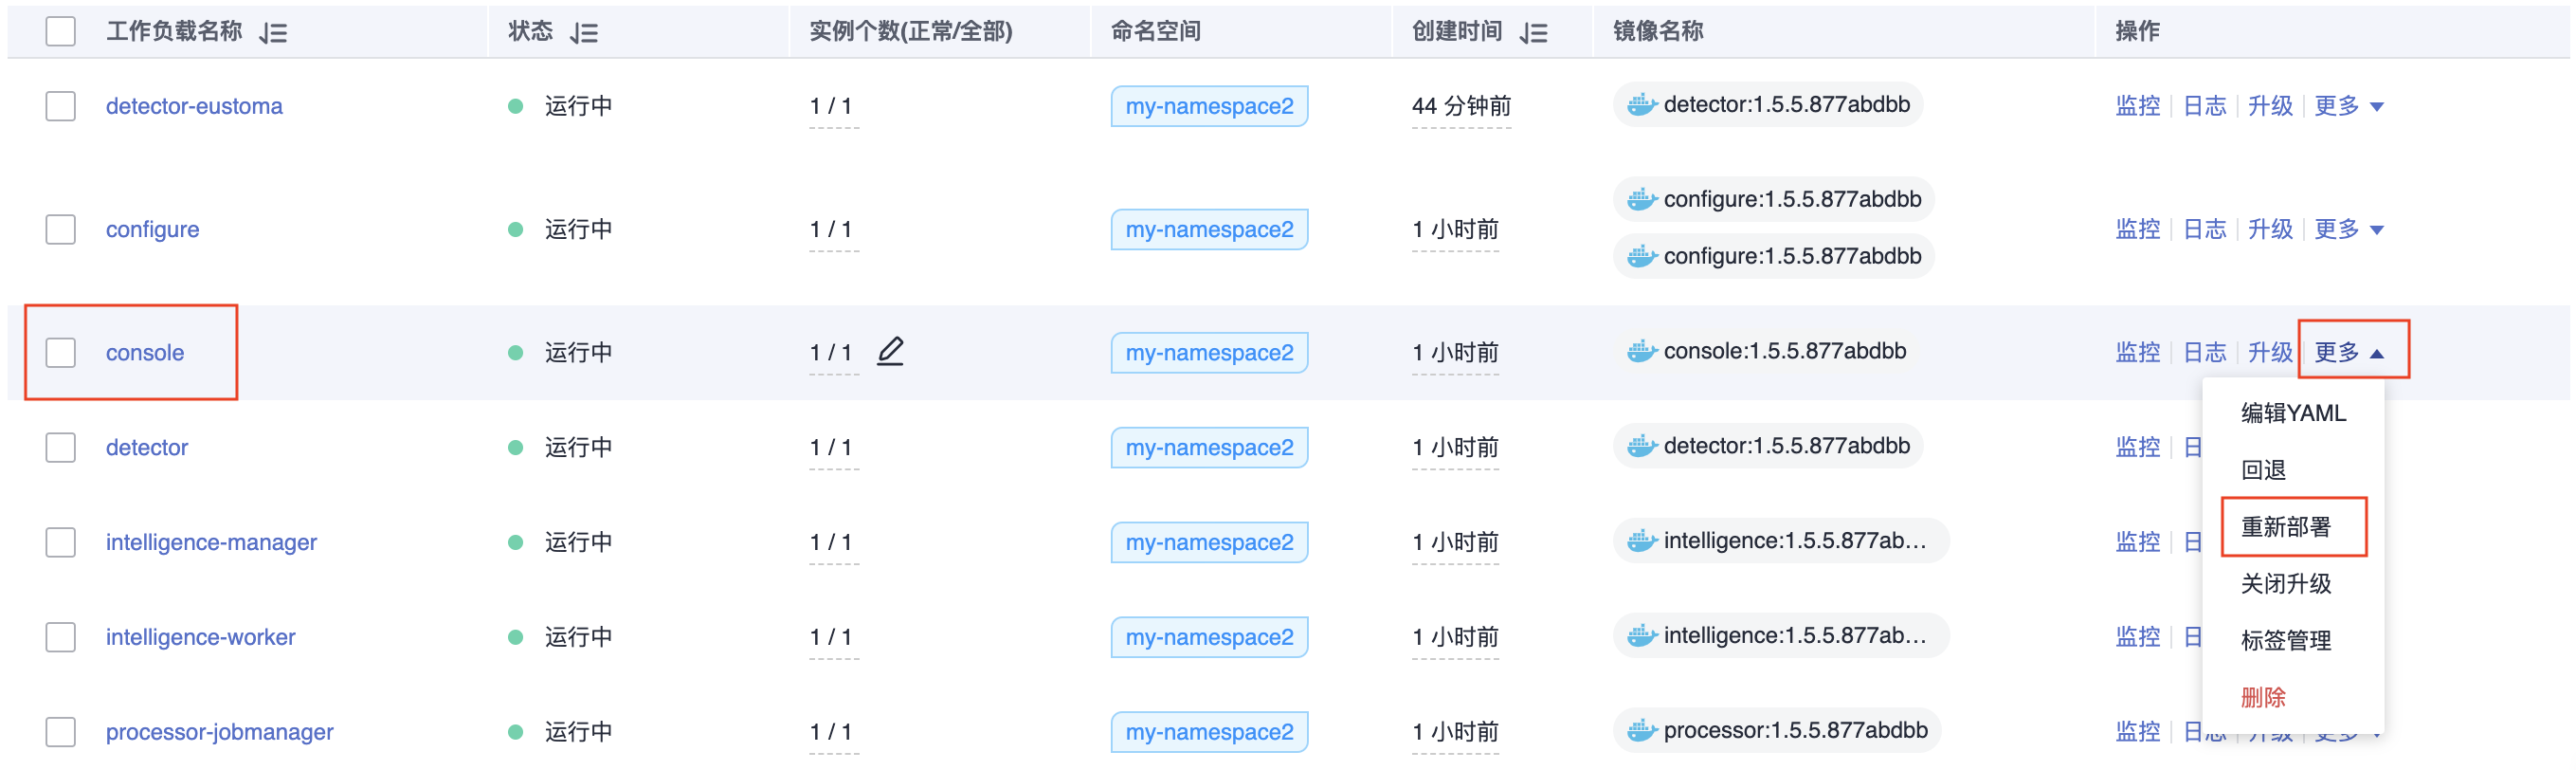
Once in the Workloads page, all workloads show as Running in the Status column, find the workload named console and click More > Redeploy in the corresponding action column, as shown in the image below.
💡 Tip:
This step is only applicable for upgrading from 1.5.4 to a higher version. Users upgrading from 1.5.5 onwards should ignore this step.
Wait until the console enters the Running status, which completes the upgrade process.
Private K8s Environment Upgrade
💡 Note:
请首先阅读 附录 1 特殊版本升级注意事项 的内容,确定当前的基础版本是否需要按照附录内容进行操作。
Please read the contents of Appendix 1: Special Upgrade Considerations: #appendix_1_special_considerations first to determine if the current base version needs to follow the appendix content.
- Prepare a PC that has installed Helm v3.10.0 or higher, as well as Kubernetes command-line tools (installation instructions can be found in the Helm official documentation: https://helm.sh/zh/docs/ and the Kubernetes command-line tool official documentation: Official documentation for the Kubernetes command-line tool). Ensure that the two tools can communicate with the cluster.
Tip:
If the download speed of the Helm installation file from the official website is too slow, you can try the following command to download the file:
💡 Note:
If the official download link for the helm installation file is too slow, you can try the following command to download the file:
curl https://labfileapp.oss-cn-hangzhou.aliyuncs.com/helm-v3.9.0-linux-amd64.tar.gz -o helm-v3.9.0-linux-amd64.tar.gz
Save the template file package provided by River Information (named revol-VERSION_NUMBER-HASH_CODE.tgz) to the PC and extract the file using the following command. After extracting, you will get a revol directory.
# Please modify the file name in the following command according to the actual file name
tar -zvxf revol-VERSION_NUMBER-HASH_CODE.tgz
``
Enter the revol directory created after unzipping and modify the values.yaml file in this directory.
You need to compare this file with the values.yaml from the previous version, ensuring the following configuration items in the new version file are the same as in the old version.
image > repository configuration
internal > password configuration for each service
smtp service configuration
external configuration for each service
💡 Tip:
This is specifically for scenarios using proprietary services. Also, do not forget to change the type to external in the new file for proprietary service configuration items. If you do not use proprietary services, this configuration can be ignored. For an understanding of proprietary services, refer to Step 2 in the Deployment Guide > 2.2.1 Configure Service Parameters and Execute Deployment section.
Execute the following command on the current PC to start the upgrade.
helm upgrade --install -n namespace release-name path-to-unzipped-template-directory -f values.yamlExplanation of parameters:
- namespace: The namespace you specified when deploying the old version.
💡 Tip:
Execute
helm list -Ato view all the template files and their corresponding namespaces.- release-name: The release name you specified when deploying the old version.
💡 Tip:
Refer to Step 4 in the Deployment Guide > 2.2.1 Configure Service Parameters and Execute Deployment section for more details.
- path-to-unzipped-template-directory: The directory revol created after unzipping the template file. You can specify a relative path here, which is the path from the current command execution location to the directory location, or directly specify an absolute path.
💡 Tip:
For a relative path, if you are in the same parent directory as the revol path, then the relative path would be ./revol, and so on.
The upgrade process will take about 5 minutes or longer (depending on network speed), so please be patient. During this period, you can repeatedly execute the following command to check the upgrade status.
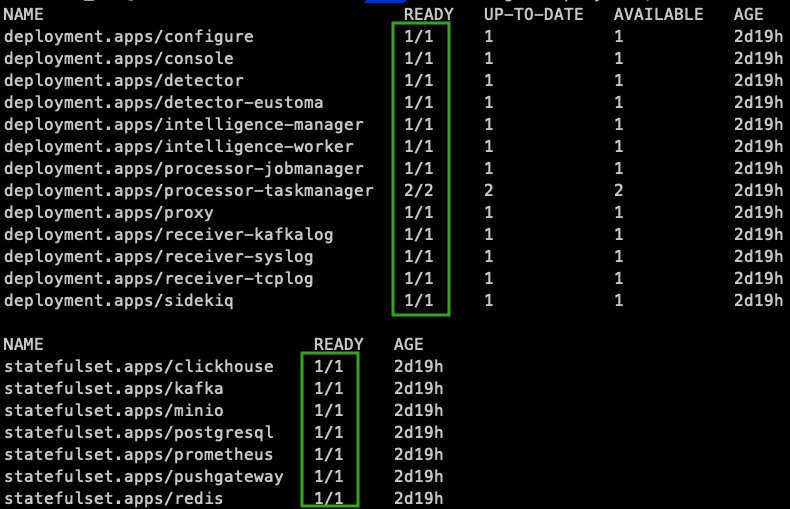
kubectl get deployment,statefulset -n namespaceIf the returned information shows the component status as depicted below, it indicates that the deployment process is complete.
Next, execute the following command to restart the console workload.
💡 Tip:
This step is only applicable for upgrading from 1.5.4 to higher versions. Users upgrading from version 1.5.5 onwards should ignore this step.
kubectl -n namespace rollout restart deployment consoleDuring the restart, you can continuously execute the following command to check the status of the console restart.
kubectl get deployment,statefulset -n namespaceOnce the READY column for console shows 1/1, the upgrade process is completed.
Appendix 1 Special Version Upgrade Considerations
When upgrading from 1.5.4-ca6686e, if you need to retain historical data, first perform the following operations.
To upgrade to other sub-versions of 1.5.4, first execute the following commands to install the patch.
 ```shell
 kubectl patch configmap clickhouse-config -p '{"metadata":{"annotations":{"helm.sh/resource-policy":"keep"}}}'

 kubectl patch configmap redis-config -p '{"metadata":{"annotations":{"helm.sh/resource-policy":"keep"}}}'

 kubectl patch statefulsets clickhouse -p '{"metadata":{"annotations":{"helm.sh/resource-policy":"keep"}}}'

 kubectl patch statefulsets kafka -p '{"metadata":{"annotations":{"helm.sh/resource-policy":"keep"}}}'

 kubectl patch statefulsets minio -p '{"metadata":{"annotations":{"helm.sh/resource-policy":"keep"}}}'

 kubectl patch statefulsets postgresql -p '{"metadata":{"annotations":{"helm.sh/resource-policy":"keep"}}}'

 kubectl patch statefulsets redis -p '{"metadata":{"annotations":{"helm.sh/resource-policy":"keep"}}}'

 kubectl patch service clickhouse -p '{"metadata":{"annotations":{"helm.sh/resource-policy":"keep"}}}'

 kubectl patch service kafka -p '{"metadata":{"annotations":{"helm.sh/resource-policy":"keep"}}}'

 kubectl patch service minio -p '{"metadata":{"annotations":{"helm.sh/resource-policy":"keep"}}}'

 kubectl patch service postgresql -p '{"metadata":{"annotations":{"helm.sh/resource-policy":"keep"}}}'

 kubectl patch service redis -p '{"metadata":{"annotations":{"helm.sh/resource-policy":"keep"}}}'
```
Then ensure in the new template file's values.yaml file that the following services' type is set to external.
minio:
  type: external

redis:
  type: external

postgresql:
  type: external

kafka:
  type: external

clickhouse:
  type: external
To upgrade to 1.5.5, in addition to the above patches and type changes, the following steps are also required.
After unzipping the new template file, copy all files in the revol/initdb.d/clickhouse/format_schemas directory to the format_schemas path of your self-built clickhouse service.
When upgrading from other sub-versions of 1.5.4 to any version, and if the clickhouse service is deployed externally, only the following operation is needed.
💡 Tip:
Ignore this operation if the clickhouse service is deployed internally.
After unzipping the new template file, copy all files in the revol/initdb.d/clickhouse/format_schemas directory to the format_schema path of your self-built clickhouse service.
After completing the respective operations based on your current base version, follow the previous upgrade steps in sequence.
Appendix 2 Manually Uploading Intelligence
💡 For users who meet the following prerequisites:
The current deployment environment cannot update the intelligence database via public internet access.
In the current deployment, the minio service is deployed as internal, meaning it is not a service you created yourself. For the concept of proprietary services, refer to Step 2 in the Deployment Guide > 2.2.1 Configure Service Parameters and Execute Deployment section.
Unzip the Offline Intelligence Database Upload.zip file provided by River Information on a PC. The unzipped directory contains a backup path, which holds the intelligence database data to be uploaded.
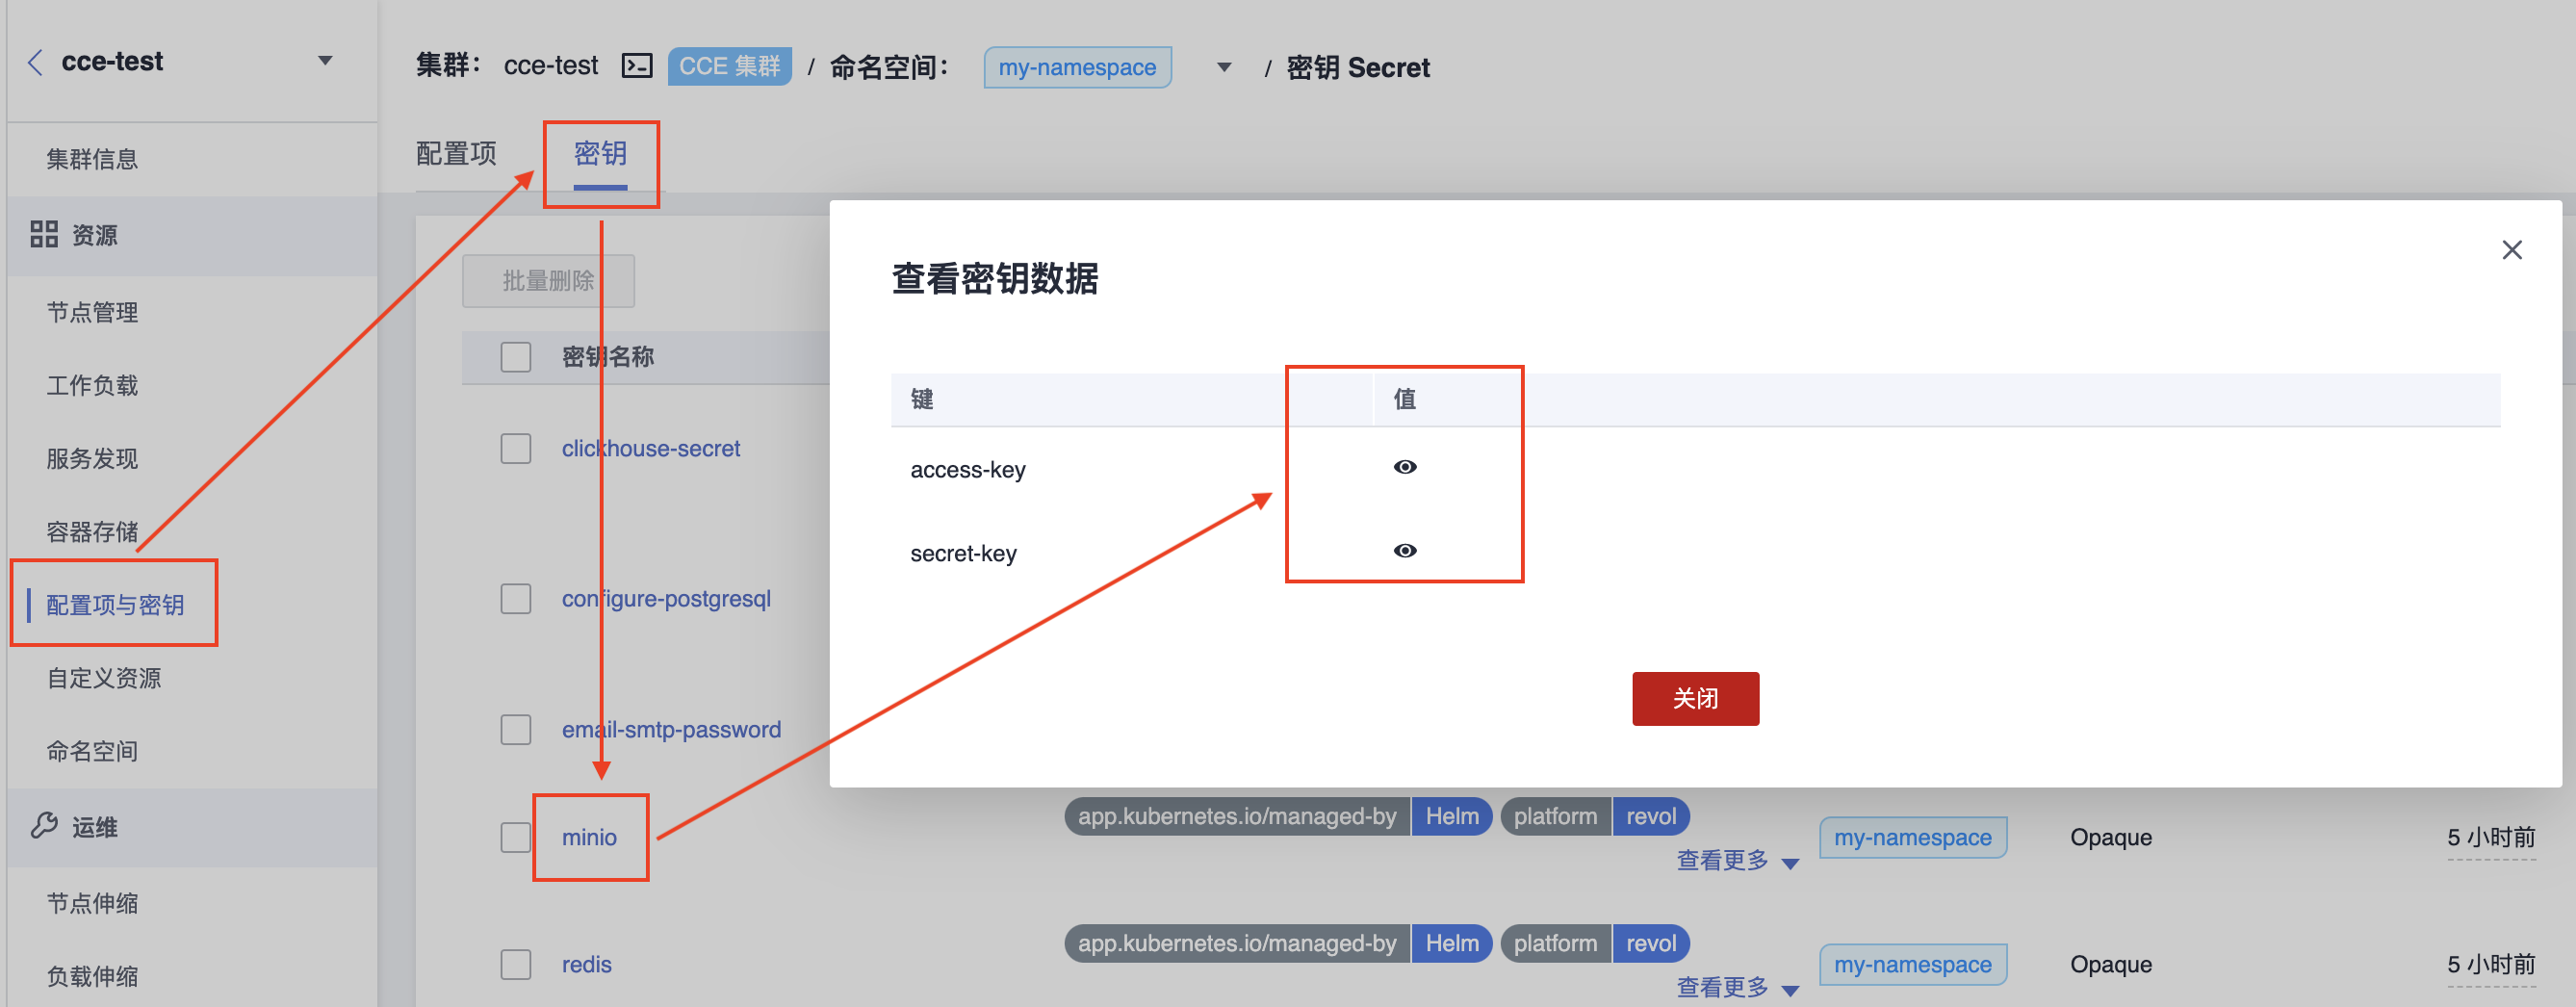
Obtain the access-key and secret-key of the minio service.
- For Huawei CCE Deployment Environment
After logging in, enter the CCE cluster interface. Then, as shown in the image below, click Configurations & Secrets > Secrets > minio. Record the access-key and secret-key shown in the popup window.
For Proprietary K8s Deployment Environment
On a PC with kubectl tool installed, execute the following commands (be sure to specify the namespace).
kubectl get secrets minio -o json -n 部署的命名空间 | jq -r '.data["access-key"]' | base64 -d

kubectl get secrets minio -o json -n 部署的命名空间 | jq -r '.data["secret-key"]' | base64 -d
The first command returns the access-key, and the second command returns the secret-key. Record them for later use.
Execute the following command in the command line interface to create the minio console service.
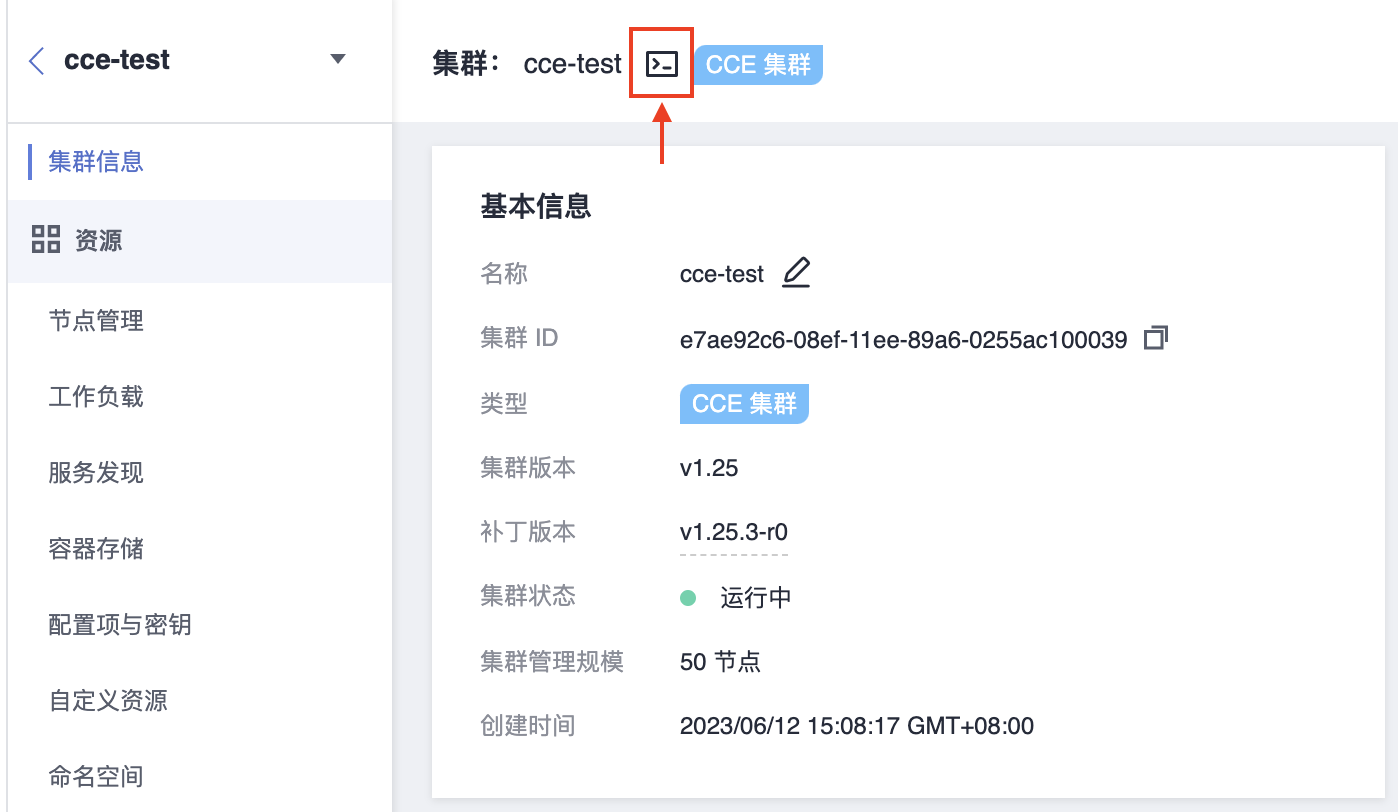
For Huawei CCE Deployment Environment
After logging in, enter the CCE cluster interface. Then, next to the cluster name at the top of the page, click the icon shown in the image below to open the CloudShell command line interface.
For Proprietary K8s Deployment Environment
Open the terminal command line interface on a PC with the kubectl tool installed.
In the command interface, execute the following command.
💡 Note:
The command below is a single command, not multiple commands. Copy all lines at once, specify the namespace, and then paste into the command line interface to execute.
kubectl apply -f -<<EOF
apiVersion: v1
kind: Service
metadata:
 name: minio-console
 namespace: 部署的命名空间
spec:
 ports:
   - name: console
     port: 9001
     protocol: TCP
     targetPort: 9001
 selector:
   app: minio
 type: NodePort
EOF
Successful execution will return service/minio-console created.
Execute the following command in the command line interface to obtain the port number of the minio console service and record it.
kubectl get services minio-console -n 部署的命名空间
Execute the following commands to obtain the node IP.
First, execute the following command to get the node names.
kubectl get nodesThen, execute the following command with one of the node names.
kubectl describe nodes 节点名称In the returned information, find the InternalIP or ExternalIP and record it, as shown in the image below.
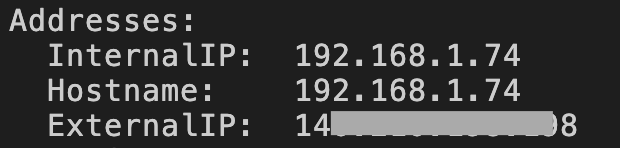
💡 Tip:
If ExternalIP is not included in the returned information, it means that the cluster does not have a public IP mapping configured. In this case, you can choose the InternalIP, the private internal IP, for subsequent steps.
On the PC where the intelligence database file was unzipped, access InternalIP + minio console port or ExternalIP + minio console port through a browser to open the login page shown below.
💡 Note:
Ensure the PC can access one of these IP addresses.
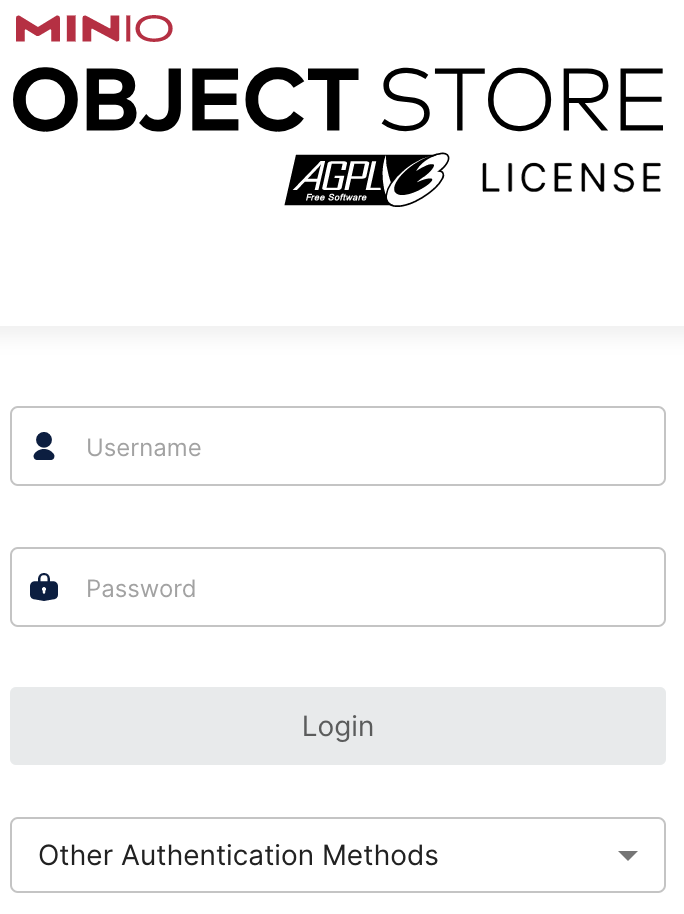
Enter the previously recorded access-key in the Username text box and the secret-key in the Password text box, then click login.
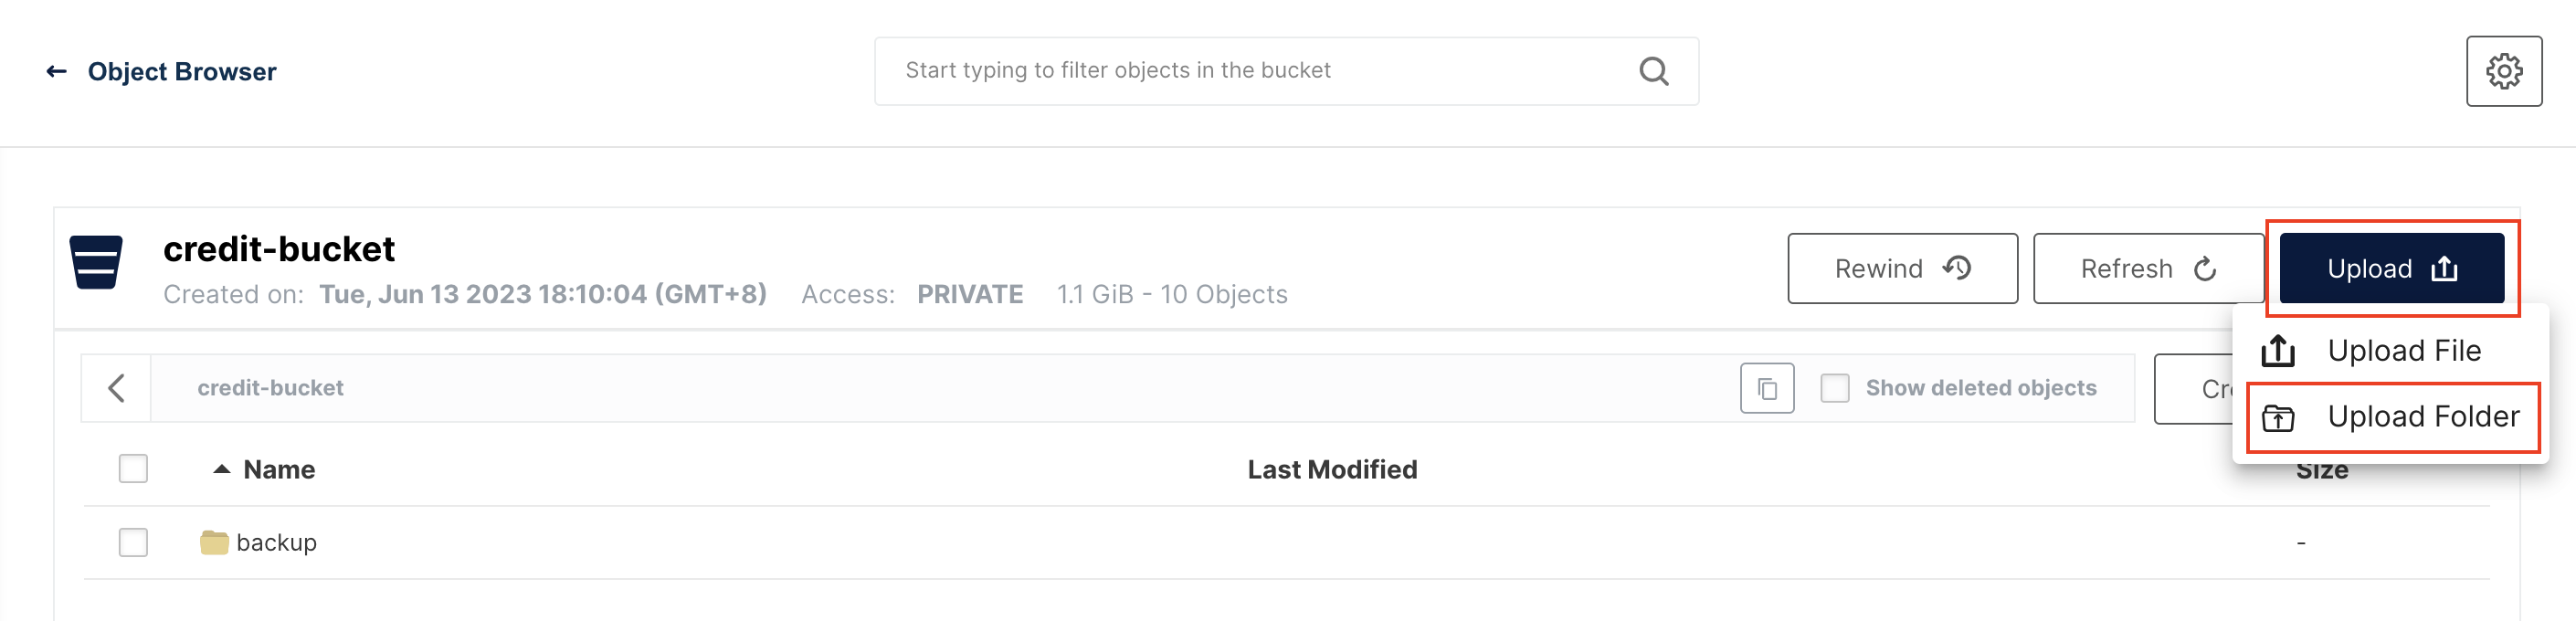
After logging in, click on credit-bucket in the page, as shown in the image below.

Then select Upload > Upload Folder on the right, specify the folder backup in the directory where the intelligence library file is decompressed, and start uploading.
After the upload is complete, run the following command to restart the intelligence service on a PC with the kubectl tool installed (or in the CloudShell command-line interface):
kubectl rollout restart deployment intelligence-worker -n 部署的命名空间The service will be available after the restart is complete.