Plugin-Based Integration Guide for OpenResty
💡 Note:
This guide is intended for sites using OpenResty as a reverse proxy server, integrating with River Cloud via plugin installation. If you're integrating through other means, please return to the Integration Guide to select the appropriate documentation. For local, private deployment of River Cloud services and plugin-based integration, proceed to the Private Deployment Guide.
The plugin supports Windows Server 2012 or later versions. The following content uses Windows Server 2012 as an example for running OpenResty. This document can also serve as a reference for other versions of Windows Server.
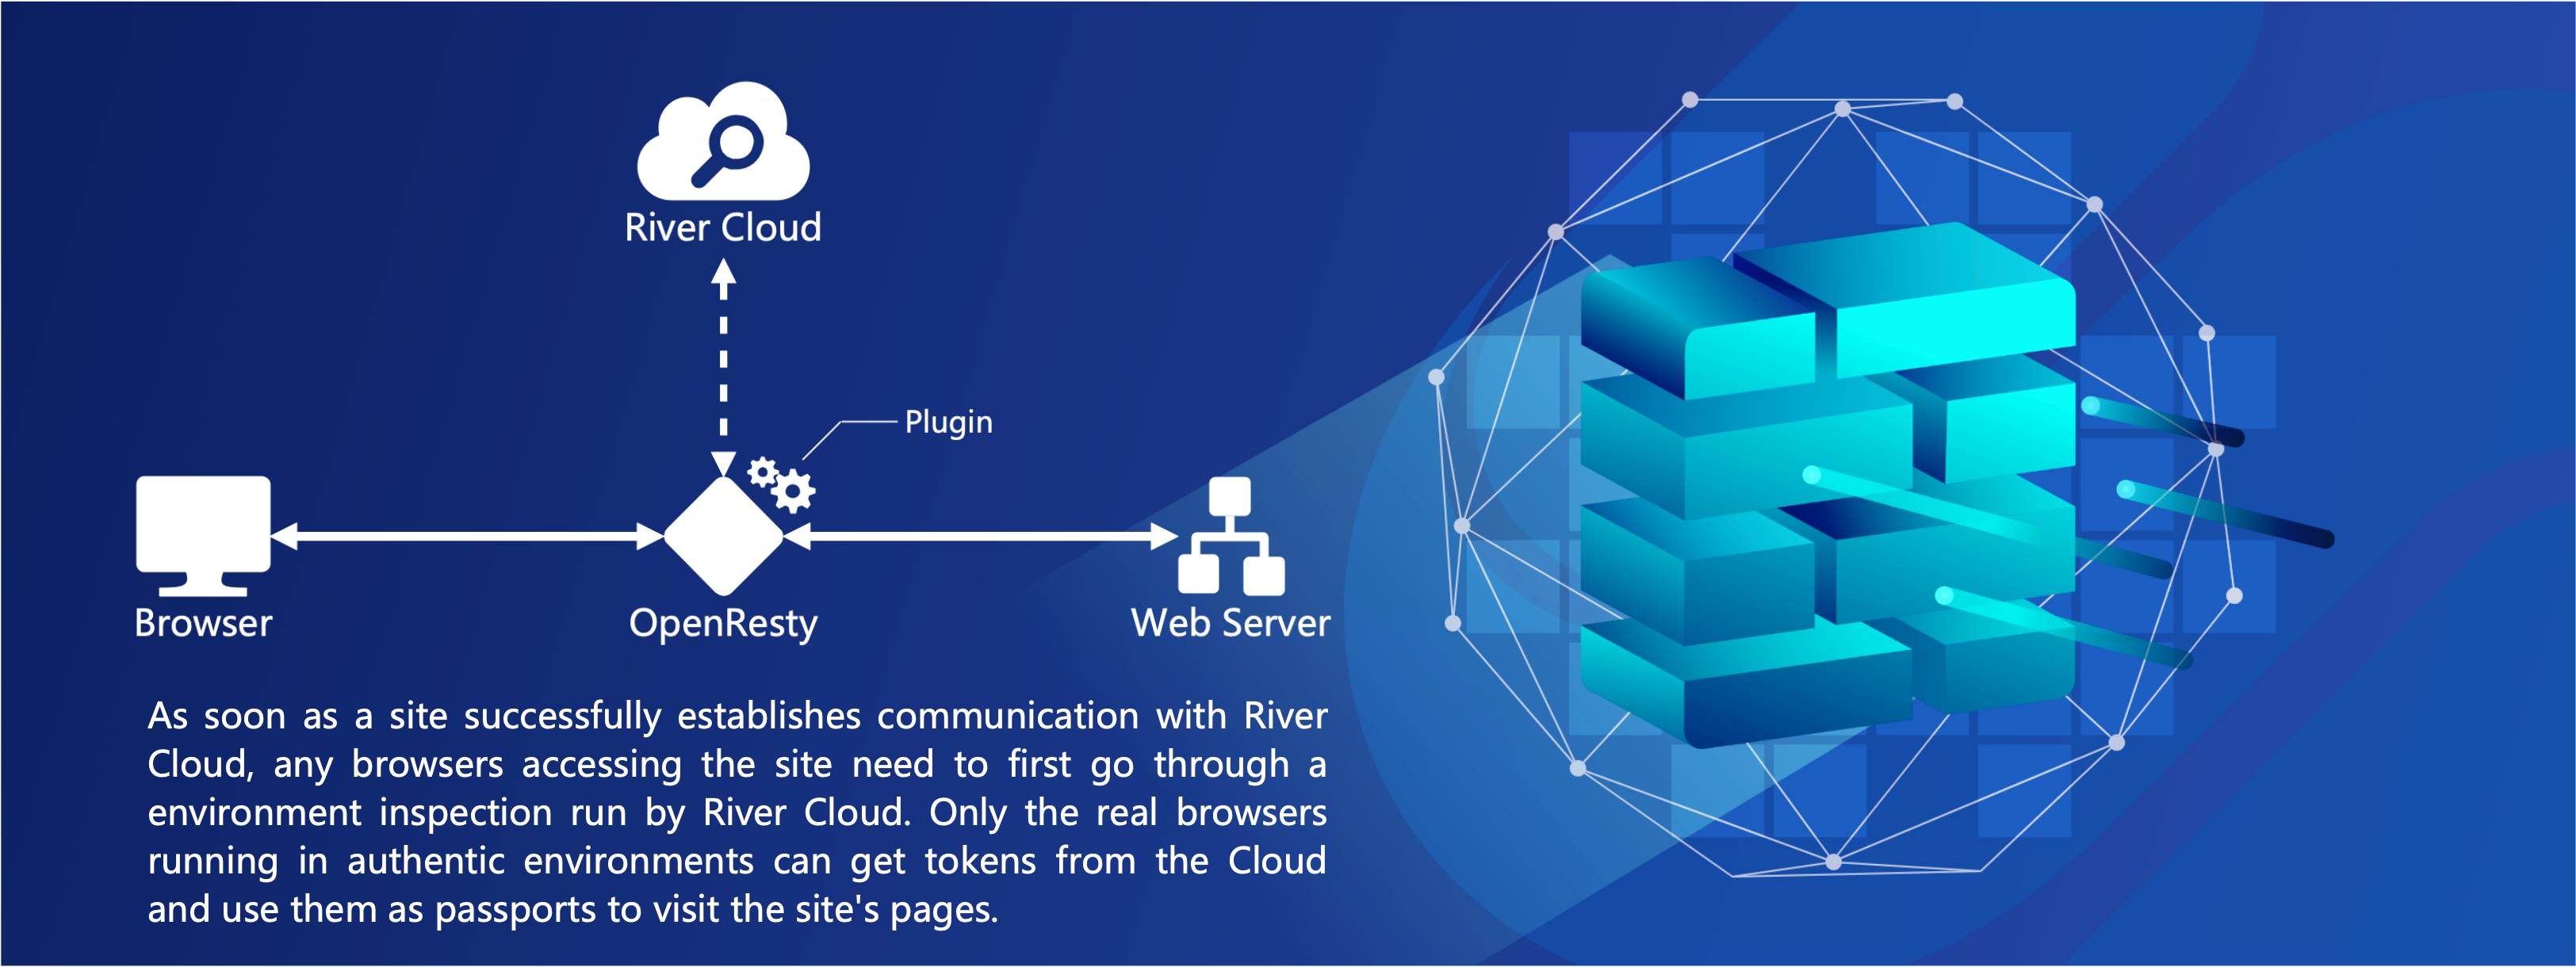
Currently, user sites with HTTP response headers containing CSP policies (Content-Security-Policy) are not supported. If such sites need to integrate with River Cloud, please disable this response header first. (For an introduction to the principles of plugin-based integration, refer to Introduction to Integration Principles)
1 Create a Site and Save Information
- First, log in to the River Cloud Management Interface with the tenant registered on River Cloud. Click Platform at the bottom of the left navigation bar, then enter the Account Management tab, as shown below. Copy the Enterprise ID number for later use.
💡 Tip:
A tenant refers to an account registered through the River Cloud login interface or through Huawei Cloud. This account has irrevocable administrative rights, allowing the creation of new administrators and modification, password reset, and deletion of new administrator accounts.

- Go to Configuration Management > Site Management.
Copy and save the Access Key under the Global Configuration tab for later use.

- Click Add Site at the top left corner of the page to enter the new site configuration interface.
Refer to the content in the User Manual > 3.1 Site Management section for configuring a new site (if the site's client is a WeChat mini-program, remember to check WeChat Mini-Program Protection) and record the domain name filled in for later use.
💡 Note:
Ensure that the domain name entered here matches the value of the server_name directive in the OpenResty configuration file.
For cases where the server_name directive in the OpenResty configuration file uses regular expressions, also refer to Appendix 2.
2 Download the Plugin
After purchasing the service (accounts without a purchased service have only a one-month trial period. Refer to How to Obtain a River Cloud Account for purchase methods), log in to the River Cloud Management Interface using the received account. Download the plugin installation file rskeeper.tar.gz to your local machine via the Plugin button at the top of the Configuration Management > Site Management page, as shown below.

Copy the file to the operating system where OpenResty is installed to prepare for installation.
3 Install the Plugin
First, ensure that OpenResty is already installed in the system. The installation method can be found in the Official Installation Instructions.
Unzip the downloaded plugin to obtain a precompiled file named similar to rskeeper_VERSION_NUMBER_xxxx_amd64.deb, and a source file named similar to rskeeper_VERSION_NUMBER_xxxx_source.tgz.
For Windows systems, only the source file is needed to install the plugin. Unzip this source file to create a folder named riversec.
Copy the folder to the OpenResty installation directory.
💡 Tip:
Assume the OpenResty installation directory is C:\openresty.
Copy the riversec folder to the C:\openresty\lualib\ directory, resulting in the directory structure C:\openresty\lualib\riversec\
4 Configure the OpenResty Server
Configuring the OpenResty server requires three steps:
❶ Backup and modify the server configuration file.
❷ Backup and modify the configuration file.
❸ Restart OpenResty.
Additionally, depending on different protection needs, these three steps can be tailored to implement two protection modes: Asynchronous Mode and Synchronous Mode.
Asynchronous Mode: In this mode, the plugin forwards the business request before receiving the detection results from River Cloud. Once the results are received, it then processes subsequent requests from that client based on the current site's working mode.
This mode is suitable for scenarios where the timing of interception is not extremely critical, allowing a small number of abnormal requests to access the server, but where high speed of gateway forwarding is essential.
💡 Tip:
If you have not purchased the rule module, it is recommended to use asynchronous mode.
Synchronous Mode: In this mode, the plugin temporarily holds the request until the detection results from River Cloud are received. Based on the current site's working mode, it then decides how to handle that request and subsequent requests from that client.
This mode is suitable for scenarios where a slight decrease in gateway forwarding speed is acceptable, but strict timing of interception is crucial, and no abnormal requests are allowed to access the server.
The following sections will introduce the configuration for both modes.
4.1 Asynchronous Mode Configuration
4.1.1 Backup and Modify the Server Configuration File
First, backup the existing OpenResty configuration file (C:\openresty\conf\nginx.conf) for potential restoration.
Assuming the existing OpenResty configuration file is as follows. To protect the path location / of the site website1.com, insert the corresponding two sets of directives in several configuration blocks (under the http configuration block and under the location / configuration block of server website1) to implement protection for the specified path of that site.
# 针对 website1.com 下的根路径进行保护
worker_processes auto;
error_log  logs/error.log error;

events {
    worker_connections  1024;
}

http {
    include       mime.types;
    default_type  application/octet-stream;
    sendfile        on;
    keepalive_timeout  65;

    ###########################
    ###### 这里插入指令集 1 ######
    ###########################

    server {
        listen       80;
        server_name  website1.com;
        #########################################################
        ###### 确保 server_name 域名与创建新站点时填写的域名相同 ######
        #########################################################


        location / {

            ###########################
            ###### 这里插入指令集 2 ######
            ###########################

            proxy_pass http://10.10.71.143:9090;
        }
    }

    server {
        listen 82;
        server_name website2.com;
        location / {
            proxy_pass http://10.10.71.143:8080;
        }
    }
}
To protect the path location / of website1.com, three modifications are required in the original configuration file:
Add Directive Set 1 under the http configuration block.
Add Directive Set 2 under the server > location / configuration block.
Ensure the server_name within the server configuration block matches the domain name entered when creating the new site on River Cloud.
The configuration file with the inserted directive sets is shown below.
💡 Note:
Comments have been added below each directive that needs modification in each directive set. Please make sure to modify them as per the comments.
4.1.2 Configure the Plugin
Modify the C:\openresty\lualib\riversec\static/conf.json file as follows:
{
  "module": "guard",
  "company": "riversec",
  "version": "VERSION_NUMBER",
  "build": "bb3b2b2b",
  "keeper_id": "keeper_GATEWAY_IP",
  "tenant_id": "default_tenant",  #### Modify with the Enterprise ID copied in section 1 ####
  "access_key": "default_access_key",   #### Modify with the Access Key copied in section 1 ####
  "endpoint_url": "https://detector.riveryun.com/4h2uWW2S/",
  "enable": true,
  "http": {
    "interval_in_seconds": 3,
    "max_retry": 3,
    "connect_timeout_ms": 500,
    "send_timeout_ms": 500,
    "read_timeout_ms": 500
  }
}
4.1.3 Restart OpenResty
After completing the above configurations, restart OpenResty to achieve integration with River Cloud.
4.2 Synchronous Mode Configuration
4.2.1 Backup and Modify the Server Configuration File
First, backup the existing OpenResty configuration file (C:\openresty\conf\nginx.conf) for potential restoration.
Assuming the existing OpenResty configuration file is as follows.
# Protect the root path under website1.com
worker_processes auto;
error_log  logs/error.log error;

events {
    worker_connections  1024;
}

http {
    include       mime.types;
    default_type  application/octet-stream;
    sendfile        on;
    keepalive_timeout  65;

    #########################################
    ###### Insert Directive Set 1 here ######
    #########################################

    server {
        listen       80;
        server_name  website1.com;
        ###########################################################################################
        ###### Ensure server_name matches the domain name entered when creating the new site ######
        ###########################################################################################

        ###########################
        ###### Insert Directive Set 2 here ######
        ###########################

        location / {

            ###########################
            ###### Insert Directive Set 3 here ######
            ###########################

            proxy_pass http://10.10.71.143:9090;
        }
    }

    server {
        listen 82;
        server_name website2.com;
        location / {
            proxy_pass http://10.10.71.143:8080;
        }
    }
}
To protect the path location / of website1.com, four modifications are required in the original configuration file:
Add Directive Set 1 under the http configuration block.
Add Directive Set 2 under the server configuration block.
Ensure the server_name within the server configuration block matches the domain name entered when creating the new site on River Cloud.
Add Directive Set 3 under the server > location / configuration block.
The configuration file with the inserted directive sets is shown below.
💡 Note:
Comments have been added below each directive that needs modification in each directive set. Please make sure to modify them as per the comments.
worker_processes auto;
error_log logs/error.log error;
events {
worker_connections 1024;
}
http {
include mime.types;
default_type application/octet-stream;
sendfile on;
keepalive_timeout 65;
1️⃣ ###### Directive Set 1 Start: Remember to specify a valid DNS address!!!
resolver 114.114.114.114 ipv6=off;
# Specify a valid DNS address for OpenResty. 114.114.114.114 is a commonly used DNS in China. Modify as needed.
# If DNS is already configured in the original file, this line can be commented out. However, ensure the existing DNS server can resolve detector.riveryun.com.
include ../lualib/riversec/conf/init.conf;
1️⃣ ###### Directive Set 1 End
server {
listen 80;
server_name website1.com;
#########################################################
###### Ensure server_name matches the domain name entered when creating the new site ######
#########################################################
2️⃣ ###### Directive Set 2 Start
include ../lualib/riversec/conf/sync/detect.conf;
2️⃣ ###### Directive Set 2 End
location / {
3️⃣ ###### Directive Set 3 Start
include ../lualib/riversec/conf/guard.conf;
3️⃣ ###### Directive Set 3 End
proxy_pass http://10.10.71.143:9090;
}
}
server {
listen 82;
server_name website2.com;
location / {
proxy_pass http://10.10.71.143:8080;
}
}
}
4.2.2 Configure the Plugin
Modify the C:\openresty\lualib\riversec\static\conf.json file as follows:
{
    "module": "guard",
    "company": "riversec",
    "version": "VERSION_NUMBER",
    "build": "bb3b2b2b",
    "keeper_id": "keeper_GATEWAY_IP",
    "tenant_id": "default_tenant",  #### Modify with the Enterprise ID copied in section 1 ####
    "access_key": "default_access_key",   #### Modify with the Access Key copied in section 1 ####
    "sync": "true",  #### Add this configuration. ####
    "endpoint_url": "https://detector.riveryun.com/4h2uWW2S/",
    "enable": true,
    "http": {
      "interval_in_seconds": 3,
      "max_retry": 3,
      "connect_timeout_ms": 500,
      "send_timeout_ms": 500,
      "read_timeout_ms": 500
    }
}
4.2.3 Restart OpenResty
After completing the above configurations, restart OpenResty to achieve integration with River Cloud.
5 Verify Integration
💡 Tip:
The following content pertains to the verification method for Web site integration. For WeChat mini-program business protection, it's necessary to integrate River Cloud's SDK package into the mini-program before successful integration. For inquiries about integrating WeChat mini-programs, please contact River Information Limited Company through the Contact Information page.
To verify that the site has successfully integrated with River Cloud, first visit the site's domain through a browser. Then, follow these two methods for verification. If the observed phenomena match the descriptions of both methods, it indicates successful site integration.
Method 1. In the browser's developer tools (press F12 to open the tool), confirm that the site contains cookies named zVZq and PpaP.
Method 2. Log in to the River Cloud Management Interface, and in the Configuration Management > Site Management page, under the Configuration Status column, ensure the plugin name keeper_GATEWAY_IP is displayed as a green background label (hover over the name to view the full name), as shown below.

💡 Tip:
The "Connected Plugin" name shown in Method 2 is the default name of the plugin. When it appears as a green label, it indicates that the plugin installed on the current OpenResty is functioning normally. This name can be changed as needed, for example, to the IP address of the current OpenResty server, indicating that the server is running the plugin. Read Appendix 1 Plugin Configuration Items for the method to change it.
6 Manual Escape
Method One
In emergency situations, you can modify the plugin configuration file C:\openresty\lualib\riversec\static\config.json to allow traffic to bypass the plugin and be directly forwarded to the backend server, ensuring the continuity of business traffic.
OpenResty to implement a manual escape. The configuration should look like this:
{
  "module": "guard",
  "company": "riversec",
  "version": "VERSION_NUMBER",
  "build": "bb3b2b2b",
  "keeper_id": "keeper_GATEWAY_IP",
  "tenant_id": "default_tenant",
  "access_key": "default_access_key",
  "endpoint_url": "https://detector.riveryun.com/4h2uWW2S/",
  "enable": false,  #### Modify to false for manual escape ####
  "http": {
    "interval_in_seconds": 3,
    "max_retry": 3,
    "connect_timeout_ms": 500,
    "send_timeout_ms": 500,
    "read_timeout_ms": 500
  }
}
Method Two
Apart from modifying the plugin's configuration file as described above, another way to achieve a manual escape is by commenting out certain lines in the OpenResty configuration file C:\openresty\nginx\conf\nginx.conf.
# For asynchronous mode, comment out these two lines added in the OpenResty configuration file
# include ../lualib/riversec/conf/init.conf;
# include ../lualib/riversec/conf/guard.conf;

# For synchronous mode, comment out these three lines added in the OpenResty configuration file
# include ../lualib/riversec/conf/sync/init.conf;
# include ../lualib/riversec/conf/sync/guard.conf;
# include ../lualib/riversec/conf/sync/detect.conf;
After commenting out the relevant lines, restart OpenResty to implement a manual escape.
Appendix 1 Plugin Configuration Items
After installing the plugin, a dedicated configuration file (C:\openresty\lualib\riversec\static\config.json) is generated. Typically, the default configuration is sufficient for effective operation and does not require additional modifications.
However, if you need to change the plugin's name, disable the plugin for a manual escape (refer to Manual Escape > Method One), or perform other operations, you can achieve this by modifying the configuration items in this JSON file.
Changing the Plugin Name
Once the plugin successfully connects to River Cloud, the plugin name (the value of keeper_id below) will be displayed in the Configuration Management > Site Management page of the River Cloud Management Interface, under the Configuration Status column, with a green background.
Therefore, it is recommended to modify the "keeper_id" value in the config.json file to an easily understandable string, such as the name or IP address of the current OpenResty server (assuming it is 10.0.0.1), as shown below:
{
  "module": "guard",
  "company": "riversec",
  "version": "VERSION_NUMBER",
  "build": "bb3b2b2b",
  "keeper_id": "10.0.0.1",  #### Modify to the name or address of the server running the plugin, to be displayed in the River Cloud Management Interface ####
  "tenant_id": "default_tenant",
  "access_key": "default_access_key",
  "endpoint_url": "https://detector.riveryun.com/4h2uWW2S/",
  "enable": true,
  "http": {
    "interval_in_seconds": 3,
    "max_retry": 3,
    "connect_timeout_ms": 500,
    "send_timeout_ms": 500,
    "read_timeout_ms": 500
  }
}
After saving, restart OpenResty, then access the site through a browser. Within 2-3 seconds, the changes should take effect. Log in to the River Cloud Management Interface, go to Configuration Management > Site Management, and you will see the
name displayed with a green background in the Configuration Status column.
List of Configuration Items
The following list provides explanations for the main configuration items in the config.json file.
enable: Determines whether to enable all functionalities under this module. It can be set to true or false, with the default being true.
keeper_id: Identifies the plugin that has successfully connected to the site. The default is revol_keeper_default.
tenant_id: Your tenant ID number, which is the Enterprise ID obtained in 1 Create a Site and Save Information section Step 1.
💡 Tip:
A tenant refers to an account registered through the River Cloud login interface or through Huawei Cloud. This account has irrevocable administrative rights, allowing the creation of new administrators and modification, password reset, and deletion of new administrator accounts.
access_key: Your exclusive access code.
http.interval_in_seconds: Sets the interval (in seconds) for health checks on the River detection service, defaulting to 3. (Also refer to Known Issues for Problem 1)
http.max_retry: Sets the number of retries for health checks on the River detection service. If the service fails to respond consecutively more than this number, the plugin functionality will be immediately disabled. The default is 3.
http.connect_timeout_ms: The connection timeout setting for health checks, with a default value of 500ms. See openresty lua sock for more details.
http.send_timeout_ms: The send timeout setting for health checks, with a default value of 500ms.
http.read_timeout_ms: The read timeout setting for health checks, with a default value of 500ms.
Appendix 2 Configuration for server_name as a Regular Expression in OpenResty Configuration File
For cases where the server_name directive in the OpenResty configuration file uses a regular expression, corresponding modifications need to be made in the C:\openresty\lualib\riversec\static\config.json file to ensure correct integration.
For example, if the OpenResty configuration file contains the following configuration:
server_name ~^(www\.)?(.+)(\.riveryun\.com)?$;
And the domain name entered when creating a new site on River Cloud is www.mysite.riveryun.com, then the following field needs to be added to the config.json file. This
"hosts": [
    { "server_name": "~^(www\.)?(.+)(\.riveryun\.com)?$",
      "alias": "www.mysite.riveryun.com" }
    ],
addition allows River Cloud to successfully match the domain name specified in the site management with the plugin's configuration.
"hosts": [
    { "server_name": "~^(www\.)?(.+)(\.riveryun\.com)?$",
      "alias": "www.mysite.riveryun.com" }
    ],
An example of the modified config.json file with the added field is as follows. After adding, restart OpenResty for the configuration to take effect.
{
    "module": "guard",
    "company": "riversec",
    "version": "VERSION_NUMBER",
    "build": "6e6c503",
    "keeper_id": "keeper_GATEWAY_IP",
    "tenant_id": "default_tenant",  #### Modify with the previously copied Enterprise ID ####
    "access_key": "default_access_key",  #### Modify with the previously copied Access Key ####
    "endpoint_url": "https://detector.BASE_DOMAIN/4h2uWW2S/",
    "enable": true,
    "hosts": [
        { "server_name": "~^(www\.)?(.+)(\.riveryun\.com)?$",
          "alias": "www.mysite.riveryun.com"}
    ],
    "http": {
        "interval_in_seconds": 3,
        "max_retry": 3,
        "connect_timeout_ms": 500,
        "send_timeout_ms": 500,
        "read_timeout_ms": 500
    }
}
Appendix 3 Uninstalling the Plugin
Uninstalling the plugin from the OpenResty server involves deleting the riversec directory.
Delete the riversec directory located in the C:\openresty\lualib\ path.
Replace the current OpenResty configuration file with the one you previously backed up.
Restart OpenResty to apply the changes.
Log in to the River Cloud Management Interface, and in the Configuration Management > Site Management page, the plugin label under the Configuration Status column should turn orange, indicating that the plugin is disconnected. If you can open the site page through a browser, it means the uninstallation was successful, and the site has returned to its state before the installation.